version: DRAFT (recommend changes in comments below)
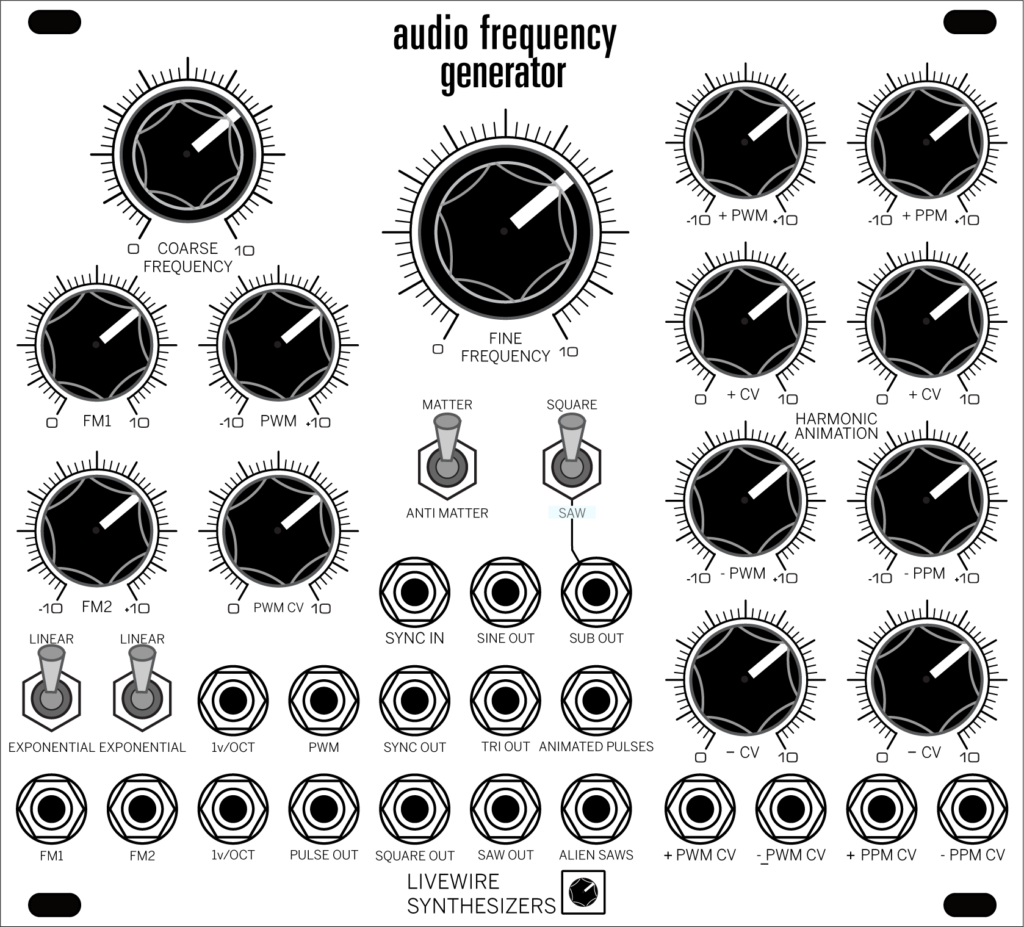
CONTROLS (knobs and switches):
COARSE FREQUENCY – pitch adjustment (wide range)
FINE FREQUENCY – pitch adjustment (narrow/fine) range
FM1 – incoming CV affects master pitch
LINEAR/EXPONENTIAL SWITCH (L) – selects response curve for FM1 input
FM2 – incoming CV affects master pitch
LINEAR/EXPONENTIAL SWITCH (R) – selects response curve for FM2 input
PWM – PULSE WAVE initial pulse width
PWM CV – pulse width modulation CV INPUT level
MATTER/ANTI MATTER SWITCH – selects “standard” or “folded” content via waveform outputs
+PPM/-PPM* – initial animated pulse position
+PWM/-PWM* – initial animated pulse width
+CV/-CV* – PULSE POSITION/PULSE WIDTH modulation CV INPUT level
INPUTS (jacks):
FM2 – FREQUENCY MODULATION CV INPUT
FM1– FREQUENCY MODULATION CV INPUT
PWM CV – FREQUENCY MODULATION CV INPUT
+PPM/-PPM* – PULSE POSITION MODULATION CV INPUT
+PWM/-PWM* – PULSE WIDTH MODULATION CV INPUT
OUTPUTS (jacks):
PULSE OUT – PULSE WAVE
SQUARE OUT – SQUARE WAVE
SINE OUT – SINE WAVE
TRI OUT – TRIANGLE WAVE
SAW OUT – SAWTOOTH WAVE
SUB OUT – SUBOCTAVE WAVE (SQUARE OR SINE)
ANIMATED PULSES – ANIMATED PULSE WAVE
ALIEN SAWS – ANIMATED PULSE WAVE WITH A SLEWED RISE
AUDIO FREQUENCY GENERATOR (AFG)
THANK YOU for purchasing the LIVEWIRE SYNTHESIZERS AFG!
The AFG – designed by founder Mike Brown – is LIVEWIRE’s take on what a stock VOLTAGE CONTROLLED OSCILLATOR (VCO) should offer to a basic eurorack modular configuration.
OVERVIEW (applies to all versions):
The AFG is a SAWTOOTH CORE VCO that will create 18 different waveform types (8 simultaneous).
Additionally the AFG offers:
2 FM CV inputs with 2 response curves (LINEAR/EXPONENTIAL via switch)
2 1vOct inputs
1 PULSE WIDTH MODULATION (PWM) CV input
HARMONIC ANIMATION from dedicated waveshaper (produces ANIMATED PULSES and ALIEN SAWS waveforms) with independent CV control of the + and – slopes of the waveform cycle
1 PULSE WIDTH MODULATION (PWM) CV input
HARMONIC ANIMATION from dedicated waveshaper (produces ANIMATED PULSES and ALIEN SAWS waveforms) with independent CV control of the + and – slopes of the waveform cycle
NEW TO VERSION 2
Improved power management
(only requires a single power cable – ver1 required separate power for HARMONIC ANIMATION)
Improved tracking (8 octave range +/- 5 cents) with separate calibration for HIGH FREQEUNCY scaling
2 SYNC options
Shallower profile (will fit the depth of most eurorack enclosures)
OPERATION:
PITCH CONTROL:
THE AFGs PITCH CONTROL zone includes 2 KNOB and 2 JACK inputs.
The COARSE FREQUENCY control knob sets the intial pitch over a broad range and the FINE FREQUENCY knob is intended to make narrow adjustments (read: fine tuning)
The 1v/Oct inputs enable CV control of the pitch. Use one of these inputs for stepped pitch control and the second for transposing stepped pitches
FREQUENCY MODULATION:
There 2 FREQUENCY MODULATION (FM) knob controls and corresponding jacks that enable LINEAR or EXPONENTIAL FM to the pitch of the AFG. LINEAR or EXPONENTIAL response is selected via the switch above each FM input jack.
PULSE WIDTH/PULSE WIDTH MODULATION:
The PULSE WIDTH and PULSE WIDTH MODULATION correspond with the PULSE WIDTH jack.
The PWM knob sets the initial “width” (aka. “duty cycle”) of the PULSE OUT waveform.
The PWM CV knob attenuates incoming CV directed at modulating the “width” of the PULSE OUT waveform.
WAVEFORM OUTPUTS:
WATCH this demonstration of all the waveforms produced by the AFG:
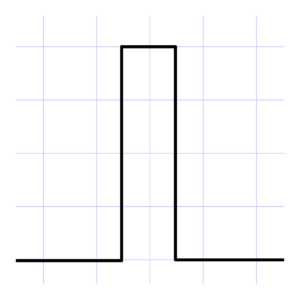
PULSE OUT – PULSE waveform:
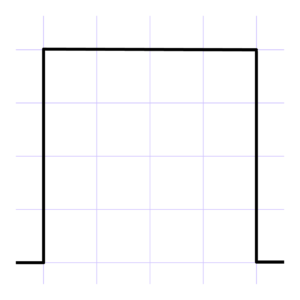
SQUARE OUT – SQUARE waveform:
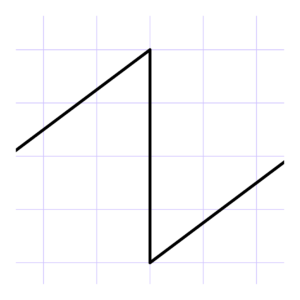
SAW OUT – SAWTOOTH waveform:
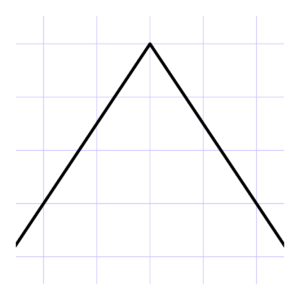
TRI OUT – TRIANGLE waveform:
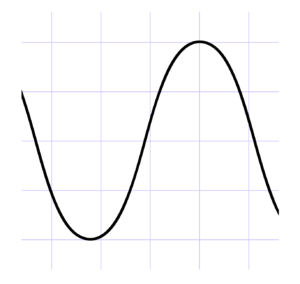
SINE OUT – SINE waveform:
SUB OUT – SQUARE or SAWTOOTH waveform 1 octave below other waveform outputs. SUBOCTAVE waveshape is selectable via corresponding switch.
ANIMATED PULSES – “DOUBLE” PULSE waveform with bi-polar (+/-) controls for PULSE WIDTH and PULSE POSITION (more information in HARMONIC ANIMATION topic below)
ALIEN SAWS – “DOUBLE” PULSE waveform with slewed upward slope. Slightly “SAWTOOTH” in sound character. Also impacted by bi-polar HARMONIC ANIMATION CONTROLS (more information in HARMONIC ANIMATION topic below)
HARMONIC ANIMATION:
The HARMONIC ANIMATION zone of the AFG begins by shaping the CORE into a PULSE WAVE and adding a second PULSE for each half of the waveforms cycle (a “DOUBLE PULSE”). In addition to setting the intial PULSE WIDTH and controlling the incoming CV for PULSE WIDTH MODULATION (PWM), there are identical controls and CV inputs for the position of each DOUBLE PULSE on the + and – slopes of the waveform.
A video demonstration of HARMONIC ANIMATION can be seen here:
HARMONIC ANIMATION
The controls of the HARMONIC ANIMATION zone are divided into 4 sections:
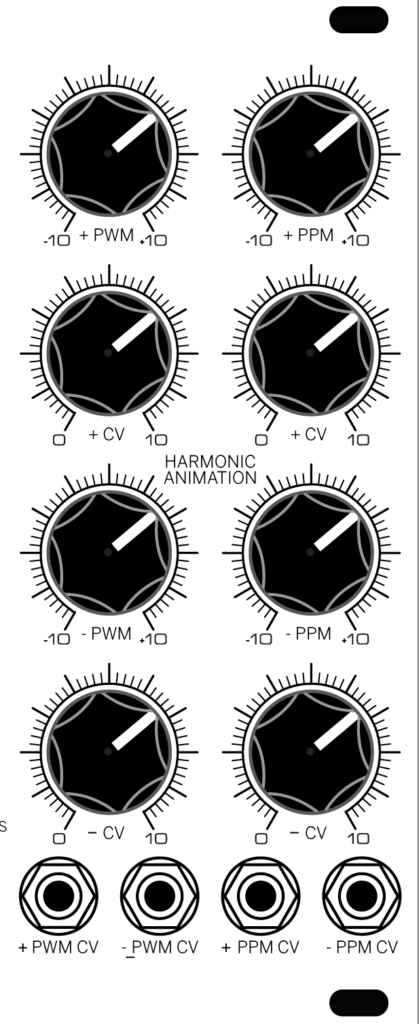
Section 1:
+PWM: sets initial animated pulse width (center is 0)
+CV: PULSE WIDTH modulation CV INPUT level
Section 2:
+PPM: initial animated pulse position (center is 0)
+CV: PULSE POSITION CV INPUT level
Section 3:
-PWM: initial animated pulse width (center is 0)
-CV: PULSE WIDTH modulation CV INPUT level
Section 4:
-PPM: initial animated pulse position (center is 0)
-CV: PULSE POSITION CV INPUT level
MATTER /ANTI MATTER:
The MATTER/ANTI MATTER selects “standard” or “folded” content via waveform outputs.
MATTER waveforms are “standard” the standard waveforms commonly associated with subtractive synthesis
ANTI MATTER waveforms are the result of the sawtooth core routed through the AFGs “Lockhart Style” wavefolder.
All AFGs ship with the onboard wavefolder set to a default with jumpers on the FLUX CAPACITOR expansion header on the rear of the unit:
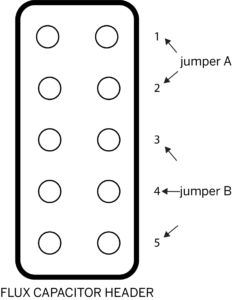
The factory default is:
Jumper A = position 1
Jumper B = position 3
Its possible to change the shape of the ANTI MATTER waveforms by changing the jumpers and their positions.
Different combinations are possible
NOTE:
Jumper A must be connected to either position 1 or 2
Jumper B must be connected to position 3, 4 or 5
These selections are static.
The Livewire FLUX CAPACITOR expansion module adds CV control of the AFGs onboard wavefolder, adding a variable sweep of the wavefolders range. More information about the FLUX CAPACITOR is available at: livewire-synthesizers.net
EXPANSION:
As of this manuals writing, there are two expansion modules planned for the AFG (headers located on rear of unit):
FLUX CAPACITOR: CV control of the AFGs onboard wavefolder.
X MOD: Cross Modulation controller for two AFGs. Source to Destination assignment + Modulation signal level.
CALIBRATION:
DISCLAIMER: The following controls are set during final assembly at Monorocket. There are few instances where further adjustment is necessary and the following is provided for information purposes. Users accept all liability for any negative consequences that result from making adjustments to any controls on the rear of the unit.
SCALING
SETUP:
- CONNECT a scaled voltage source to either of the 1v/Oct INPUTS
- CONNECT
audio from the SQUARE OUT jack to a tuner (or an audio channel mixed
with a reference tone)
step 1:
- LOCATE
the scaling adjustment trimpot
on
the back of the AFG.
Version 1: VR101
Verison 2: VR101 (also labeled TRACK)
NOTE:
Version 2 also has a trimpot labeled HF Track. Setting this trimpot
will be addressed after the initial scaling instructions.
WARNING:
ADJUSTING ANY OTHER TRIMPOT WILL RESULT AFFECT THE
WAVEFORMS
step 1:
PLAY C4 and – using the COARSE
FREQUENCY control – tune the AFG to C4
step 2:
PLAY C1
and – using the SCALING ADJUSTMENT – tune the AFG to C1
step
3:
PLAY C4 and – using the COARSE FREQUENCY control – tune the
AFG to C4
step 4:
PLAY C1 and – using the SCALING
ADJUSTMENT – tune the AFG to C1
REPEAT steps 1 – 4 until
C4 and C1 are in tune without further adjustment
(Only Steps 1
– 4 are necessary for a Version1 AFG, the remaining instructions
are for Version 2)
step
5:
PLAY C8 and – using the HF TRACK trimpot – tune the AFG to
C8
step 6:
PLAY C4 and – using the COARSE FREQUENCY
control – tune the AFG to 4
REPEAT steps 5 – 6 until C4 is
in tune and C8 is within the acceptable range of +/- 5 cents
Hey there – You say there are 2 sync options but it does not appear to be very obvious how to access those? Do you mean hard sync and soft sync and if so how would you change between?
the SYNC options are selected via jumper on the rear of the AFG